1. INTRODUCTION
BZOTech Magento 2 Mega Menu extension allows you to create an elegant effective menu for your online store without having to know much how to code. It helps to improve customer shopping experience by displaying menus clearly and flexibly, making it easy for customers to find the categories, links they need, or products and links that shop owners want to show. Magento 2 Mega Menu module offers flexible navigation, without requiring you to have programming skills.

TABLE OF CONTENT
* * * * * * * * * * * * * * * * * * * * * * * * * * * * * * * * *
3.1. Primary / Secondary Configuration
4. MENU DROPDOWN CONFIGURATION
4.2. BZOTech – Megamenu General
4.3. BZOTech – Megamenu Content
2. HOW TO INSTALL & REMOVE
This instruction is applied for Magento 2.x.
2.1. Install:
- Extract the package: bzotech-megamenu-magento2.4.x-v1.0.0.zip
- Copy code to folder root magento (Magento installation folder)
- Go to root magento folder, run commands:
php bin/magento setup:upgrade
Then:
php bin/magento setup:static-content:deploy -f
If you are using Magento Production mode, run the command:
php bin/magento setup:di:compile
2.2. Remove:
Go to root magento folder, run commands:
rm -rf app/code/BzoTech/Megamenu
Then:
php bin/magento setup:upgrade
And:
php bin/magento setup:static-content:deploy -f
If you are using Magento Production mode, run the command:
php bin/magento setup:di:compile
3. GLOBAL CONFIGURATION
Global settings will be common for every created or available menu preset. Global configuration includes configs for Primary / Secondary Configuration and Secondary Menu Items.
3.1. Primary / Secondary Configuration
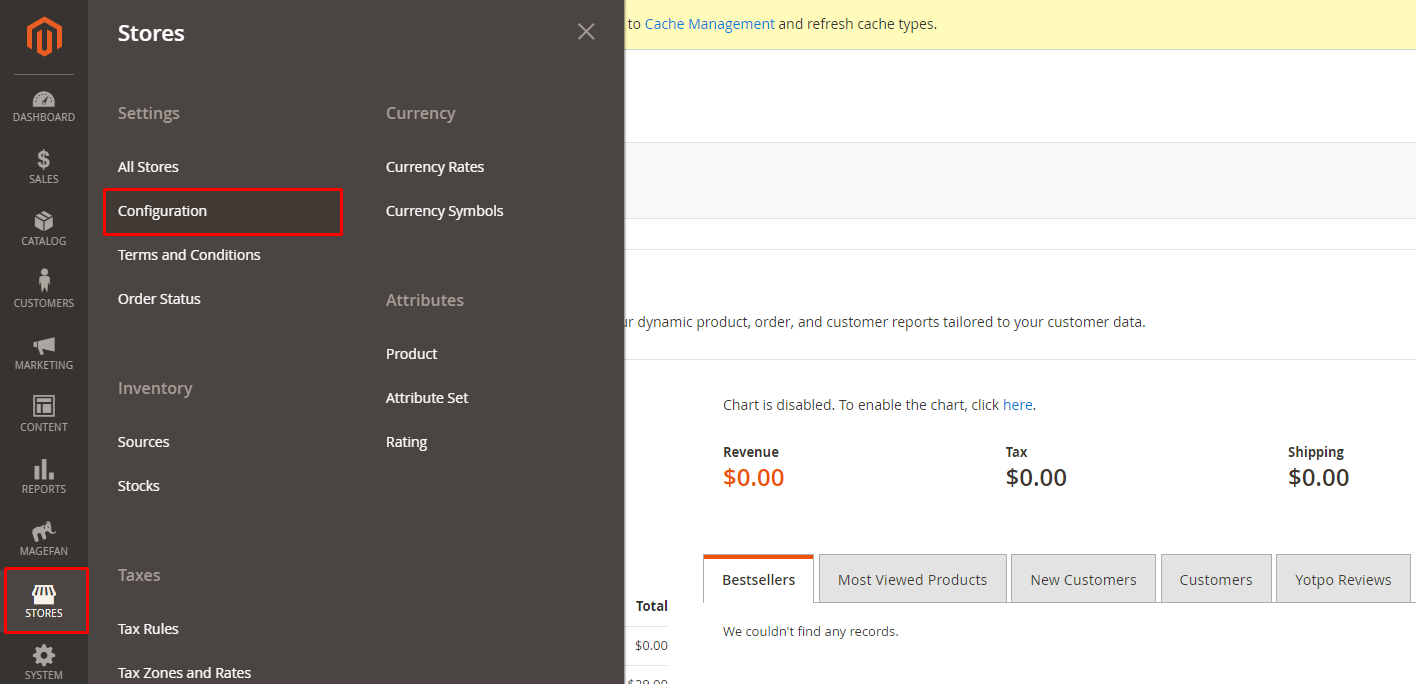
- Go to Admin Dashboard
- Go to Store -> Configuration
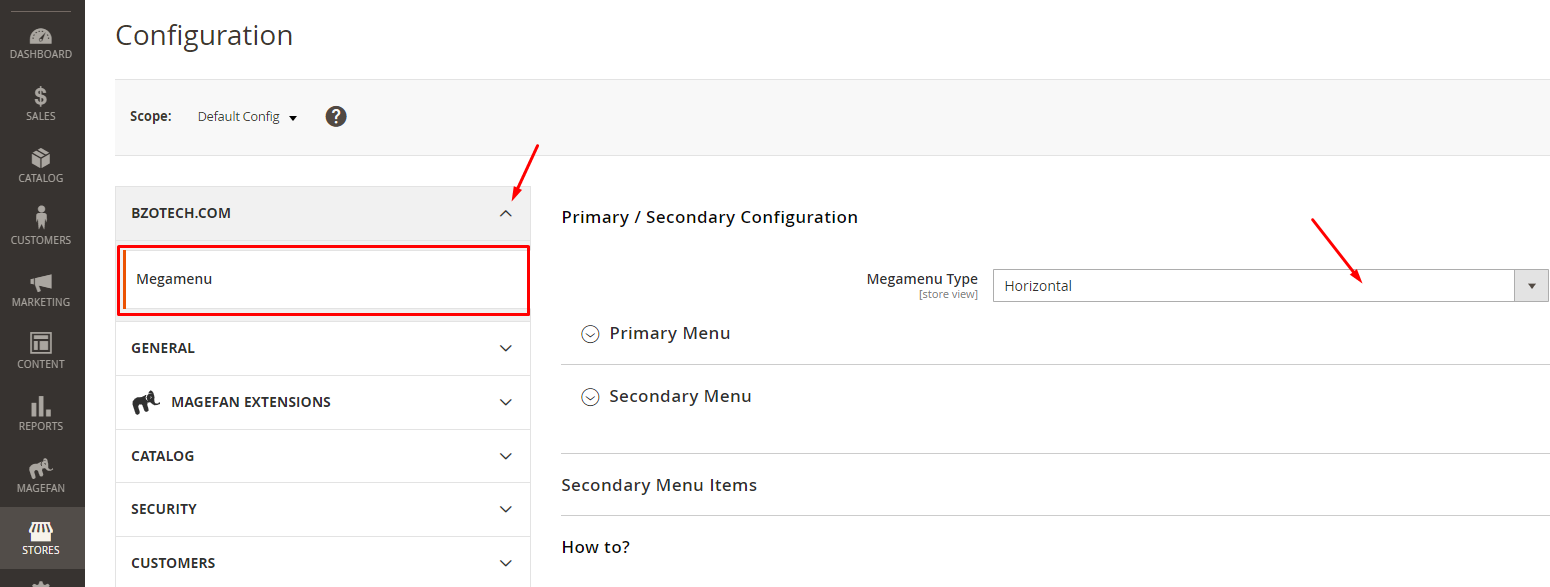
- In BZOTech.Com section -> Select Megamenu
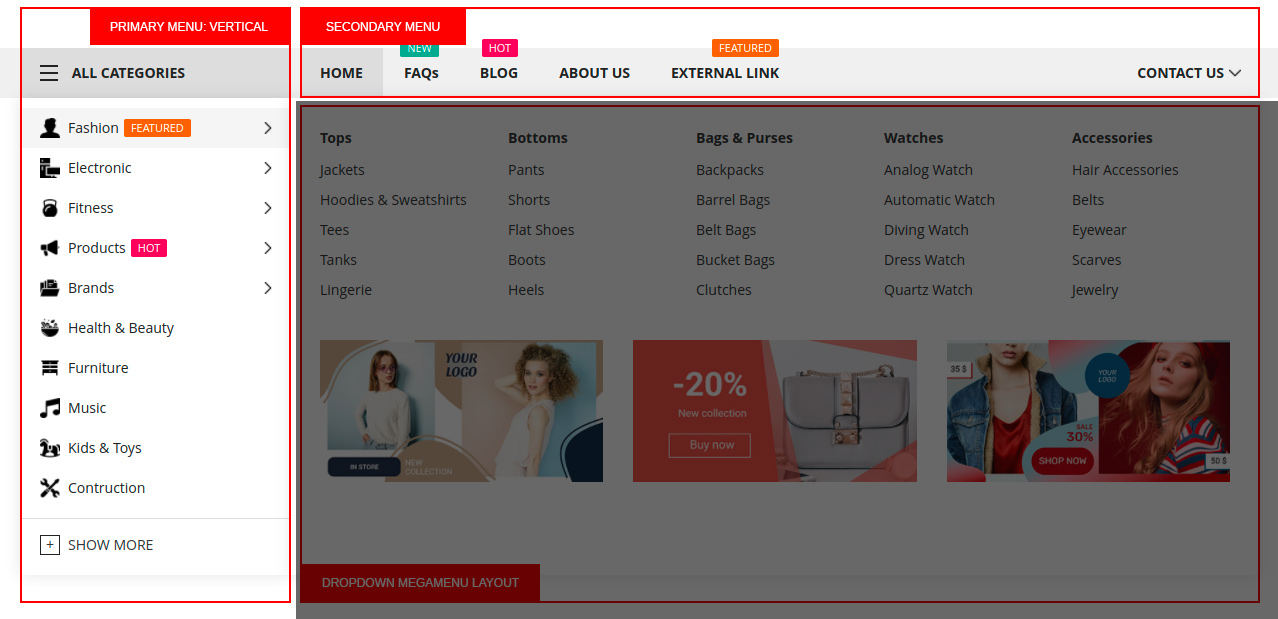
- Megamenu Type: There are two menu types: Horizontal menu and Vertical menu. You can select the menu type based on your needs.
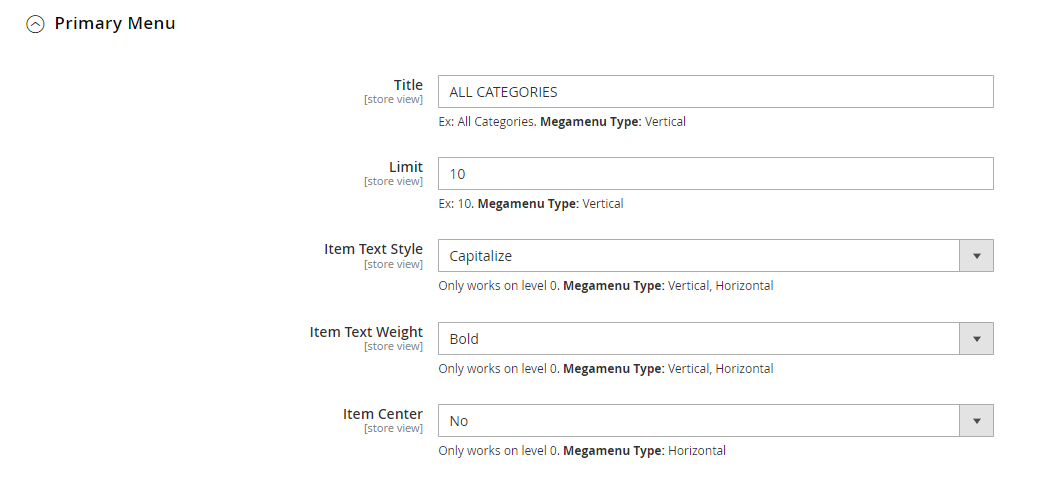
3.1.1. Primary Menu
| Config Name | Value | Description |
|
Title (Apply to Vertical menu) |
Ex: CATEGORIES |
Name of the menu |
|
Limit (Apply to Vertical menu) |
Ex: 10 |
The number of the item to show. If the item’s number is larger or less than “Limit”, it will show Show more / Show less button. |
|
Item Text Style (Only apply on level 0) |
Inherit
Uppercase Capitalize Lowercase |
Inherit: Inherit style from the item root categories
Uppercase: Show title in capital letters. Capitalize: Uppercase the first letter in title. Lowercase: Show title in lower case. |
|
Item Text Weight (Only apply on level 0) |
Bold
Normal |
Bold text Normal text |
| Item Center
(Only apply on level 0 & Horizontal menu) |
Yes/No |
Yes: Align center No: Not align center |
3.1.2. Secondary Menu

| Config Name | Value | Description |
|
Item Text Weight (Only apply on level 0) |
Bold
Normal |
Bold text
Normal text |
| Item Center
(Only apply on level 0) |
Yes/No |
Yes: Align center No: Not align center |
3.2. Secondary Menu Items
This part is for configuring secondary menu items and adding new secondary menu item.
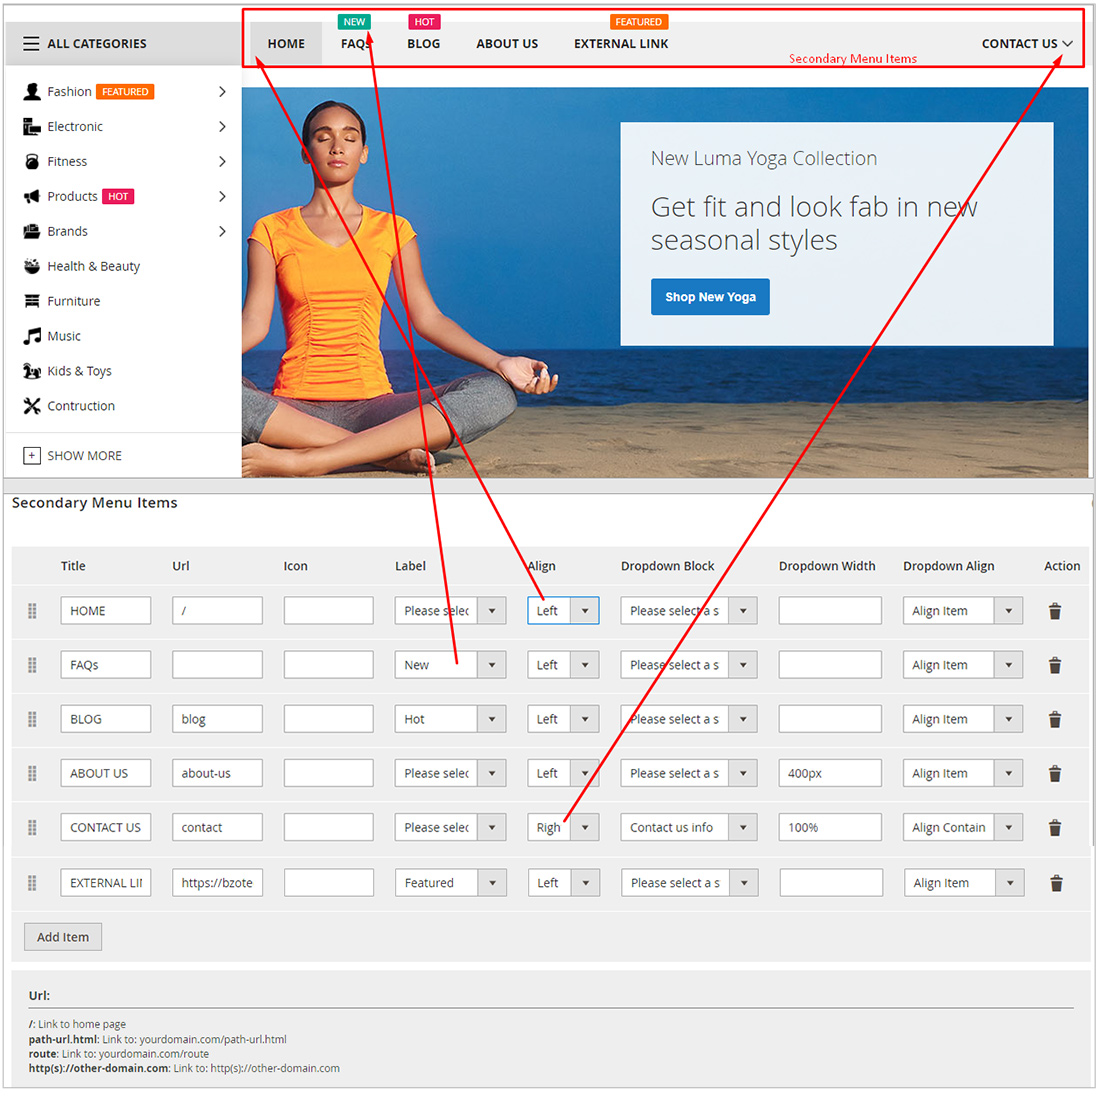
- Title: Menu name
- Url:
- /: Link to home page
- path-url.html: Link to: yourdomain.com/path-url.html
- route: Link to: yourdomain.com/route
- http(s)://other-domain.com: Link to: http(s)://other-domain.com
- Icon:
- Label: New/Hot/Sale/Featured
- Align: align left or right
- Dropdown Block: display static block or not. To manage static blocks, go to CONTENT -> Blocks.
- Dropdown Width: set width for the dropdown.
- Dropdown Align: Align Container Left/Align Container Right.
To add new secondary menu item, select Add Item button and config fields.
4. MENU DROPDOWN CONFIGURATION
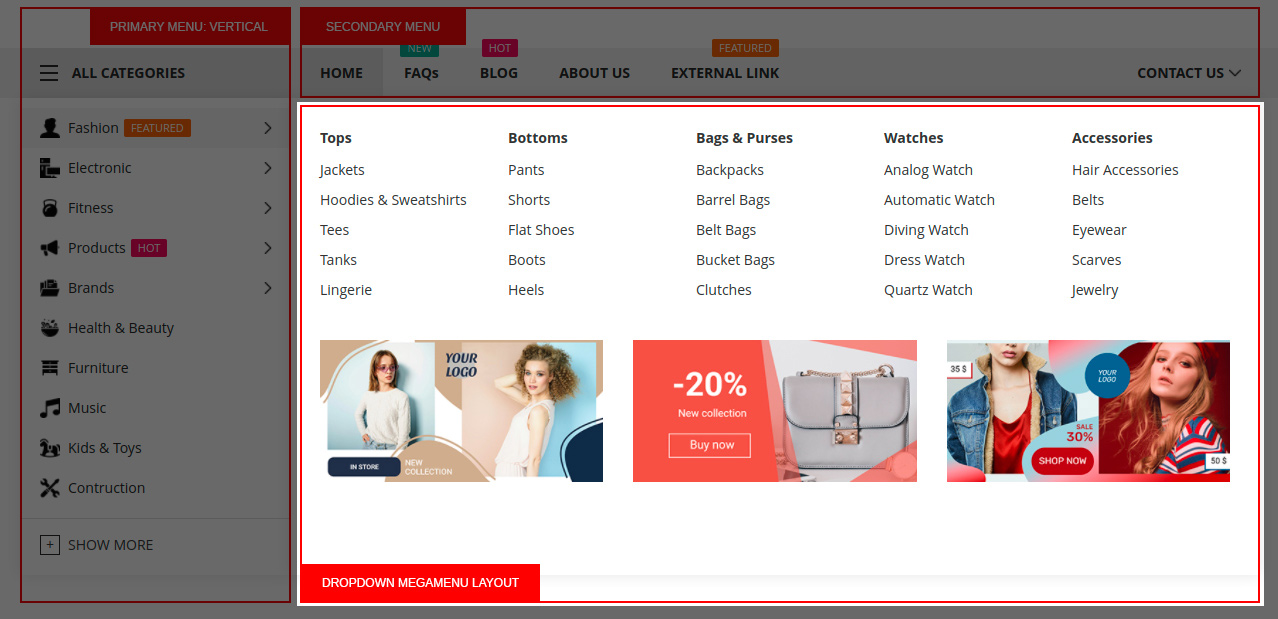
4.1. Config Menu Item
In CATALOG -> Categories, select the menu item you want to config. For example, menu Fashion. There are 3 tabs for configuring:
- BZOTech – Megamenu General
- BZOTech – Megamenu Content
- BZOTech – Megamenu Content Layout

4.2. BZOTech – Megamenu General
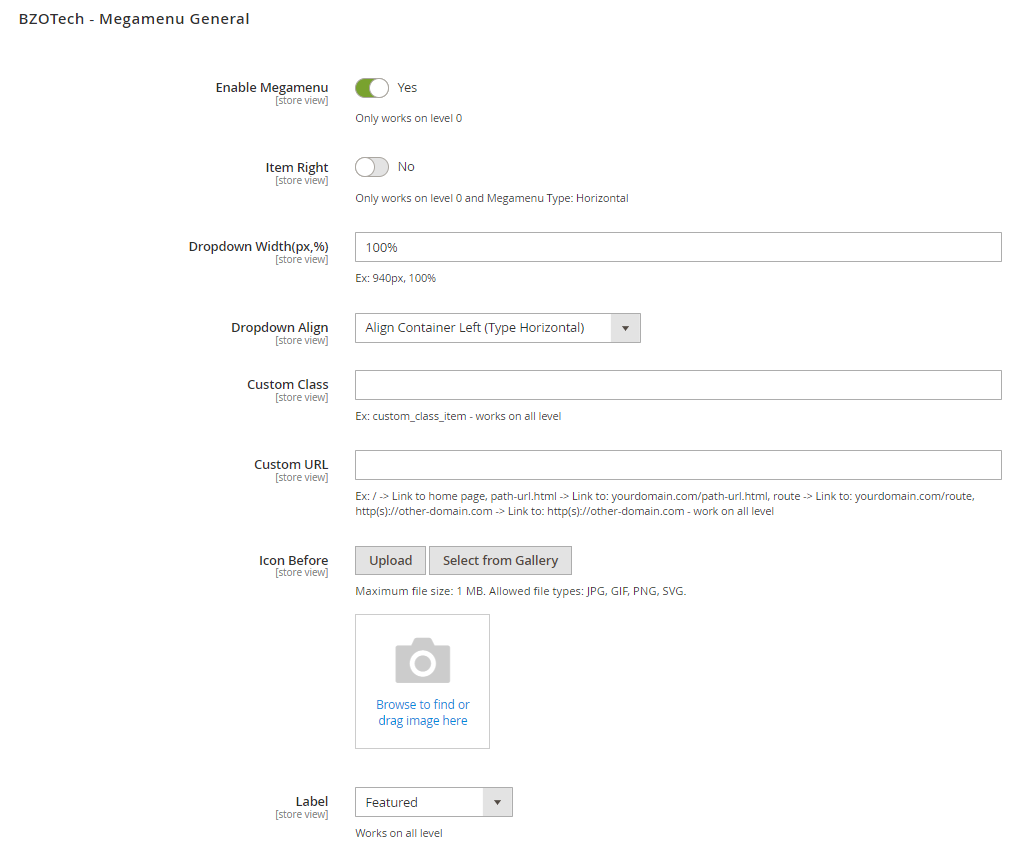
| Config Name | Value | Description |
| Enable Megamenu | Yes/No |
Yes: Display dropdown menu in megamenu type No: Display dropdown menu with classic type |
| Item Right | Yes/No |
Yes: Align item to the right No: Default align to the left |
| Dropdown Width (px,%) | 970px, 100% | Width of Dropdown Megamenu in px or % |
| Dropdown Align |
Align Item (Type Vertical and Horizontal) Align Container Top (Type Vertical) Align Container Left (Type Horizontal) Align Container Right (Type Horizontal) |
Dropdown Megamenu is align according to item or container. If Dropdown Width is set in %, it is recommended to use Dropdown Align according to Container. |
| Custom Class | Ex: custom_class | Add custom class custom_class to item |
| Custom URL |
Ex: contact categories.html https:// bzotech.com/ |
contact: Link to page yourdomain/contact categories.html: Link to page yourdomain/categories.html https://bzotech.com: Link to bzotech.com |
| Icon Before | Image | Add icon for item |
| Label | New/ Sale/Hot/Featured | Add label for item |
4.3. BZOTech – Megamenu Content
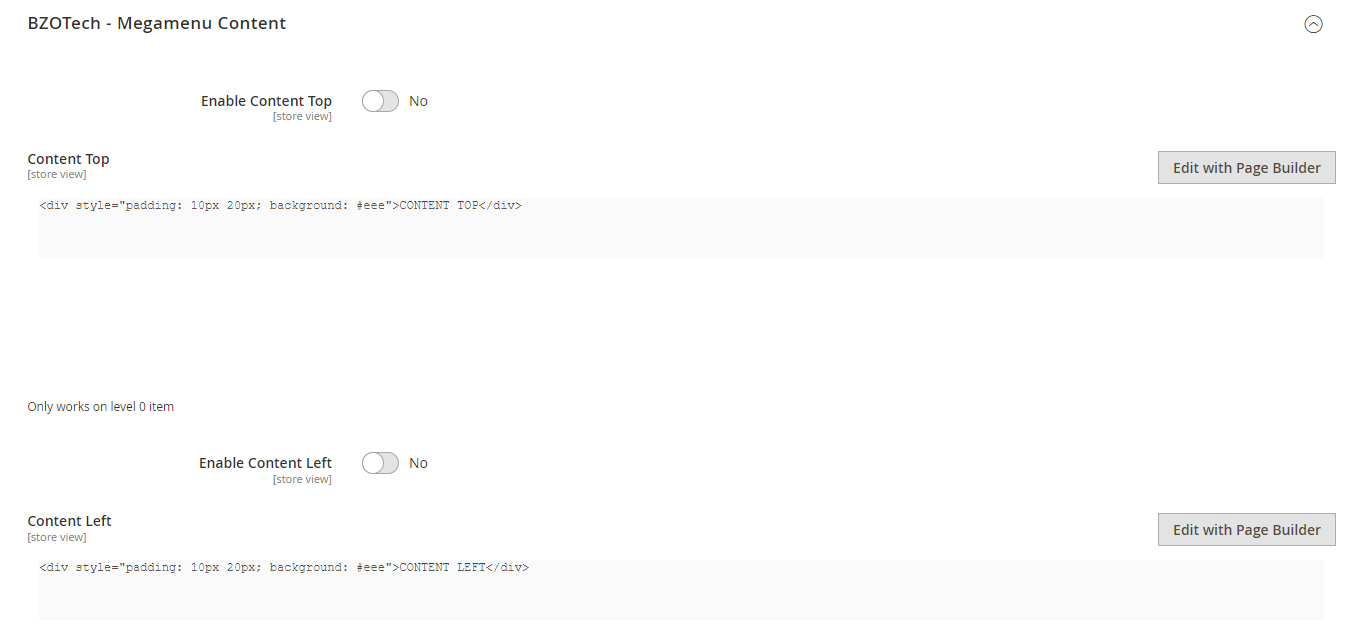
| Config Name | Value | Description |
|
Enable Content Top Enable Content Left Enable Content Right Enable Content Bottom |
Yes/No |
Enable/Disable Block Top, Left, Right, Bottom Note: Only apply to item Level 0 |
|
Content Top Content Left Content Right Content Bottom |
Editor to input data for Block Top, Left, Right, Bottom. This editor can be used with Magento page builder. Note: Only apply to item Level 0 |
4.4. BZOTech – Megamenu Content Layout

| Config Name | Value | Description |
| Column Left Width(%) | 30 |
Width of Block Left in % |
| Category Column | 1 -> 8 Columns |
Number of column of Block Categories Block Categories width will be automatically calculated based on the width of Block Left & Block Right |
| Column Right Width(%) | 30 |
Width of Block Right in % |
Note:
There are 5 styles of Megamenu dropdown: Block Top, Block Left, Block Categories, Block Right, Block Bottom (as in 4.2.2 & 4.2.3). Block Categories will show subcategories from 1 to 8 columns. You are free to add content such as: text, image, widget, product, call module… into Block Top, Left, Right, Bottom via input Editor.
5. SUPPORT
Knowledge Base
Before filing a new support ticket, please follow the steps below to assist us expedite your request. This is for everyone’s advantage and will assist to make the entire process more efficient. It’s critical, and we ask that everyone to these guidelines.
Read the item documentation first:
The documentation covers all the item setting and configuration. You may find the solution for your issues here.
We support the item in accordance with Envato’s Support Policy:
We will review and respond to the ticket within one business day (except for weekends and holiday). Please review the Envato’s Support Policy to see what is and is not covered by item support. Please keep in mind that only one website should be supported for each item purchase code. If your support license has expired, please renew it to continue receiving technical help.
Important considerations for your website:
- Runs the most recent version of the item and validate all Theme Requirements.
- Disable any other third-party plugins you may be using to see whether this resolves the issue.
- Clear and deactivate all caches, including browser, plugin, and server caches.
To open a support ticket for the item on our HELP CENTER, choose the Department and then provide the theme purchase code in the ticket and submit. Please keep in mind that providing us with information about your website and some screenshots of the problem will make it simpler for us to answer your query and assist you more quickly.
Important!
DO NOT REPLY TO THE TICKET VIA THE EMAIL NOTIFICATION. Any responses sent via this no-reply-email may be overlooked since our support team was unable to view them.
If you have any problems with the ticket system, please contact us at [email protected] for assistance. However, the first option is more convenient and makes it easy for both of us to monitor the problems.


