1. GETTING STARTED
We would like to thank you for purchasing MedXtore WordPress Theme. MedXtore WooCommerce theme is extremely effective and ideal for any WordPress projects. Wonderful theme with excellent user experience.
Before you begin, please be sure to go over this material. We layout a lot of useful information and provide you all the information you need to utilize the MedXtore Theme.
If you can’t find your solution in our documentation, please go through our WordPress Theme FAQs or contact us via the support page. We are delighted to assist you, and you will receive a response from us much sooner than you anticipated. Thank you for your interest in the MedXtore WordPress Theme; we hope you enjoy it!
WordPress Background Knowledge
You must have a functional version of WordPress installed in order to install this theme. Follow the instructions if you need assistance installing WordPress in WordPress Support.
Useful links for WordPress information.
-
- WordPress Codex – General info about WordPress and how to install on your server.
- First Steps With WordPress – General info about multiple topics about WordPress.
- FAQ New To WordPress – The most popular FAQ’s regarding WordPress.
TABLE OF CONTENT
* * * * * * * * * * * * * * * * * * * * * * * * * * * * * * * * *
2.2. Theme Installation and Update
2. INSTALLATION
2.1. System Requirements
Please ensure that your hosting provider and website match the minimal criteria listed below before installing the theme:
To run MedXtore, we recommend your host and website support:
- Minimum requirements to run WordPress.
- Use the most recent version of WordPress.
- Always use strong passwords for FTP and databases.
Important Note about PHP Configuration:
You may encounter issues linked to low PHP configuration restrictions in a variety of situations, such as a white screen, demo material that fails to import, empty page content, and other similar concerns. The fix is to raise the PHP limitations. You may change this on your own by modifying the php.ini file in the root directory, or you can contact your web host and request that they increase those limitations to a bare minimum, as shown below.
max_input_time = 6000memory_limit = 128Mmax_execution_time= 6000post_max_size = 64Mupload_max_filesize = 32Mset_time_limit (600)
2.2. Theme Installation and Update
IMPORTANT: There are 2 theme files and child themes respectively.
- bw-medxtore-v2.6.zip – For Demo 1 to Demo 12
- bw-medxtore-v2-v3.0.zip – For Demo 13 to Demo 20
Before installing MedXtore theme, you need to have a WordPress site that meets all the theme requirements and have the latest MedXtore theme package available in your computer.
VIDEO GUIDE:
2.2.1. Theme Installation
- Navigate to the Admin Panel of your site (i.e. yoursite.com/wp-admin/).
- Login to your WordPress Dashboard and go to
Appearance > Themeand clickAdd Newto add new theme. - Click the
Upload Themebutton thenChoose Fileand selectbw-medxtore.zipfile and clickInstall Now. - It will take a few minutes to install the theme.
- After seeing the message Theme installed successfully, click on
Activate, you can use MedXtore for your site.
FTP Upload
- Access your FTP client, such as FileZilla to start upload MedXtore theme.
- Navigate to the folder of your website (i.e. yoursite.com/wp-content/themes) then upload and extract theme file
bw-medxtore.zipto this directory. After that, you will have a theme folder named as MedXtore in your site’s directory. - Login to the Admin Panel of your site (i.e. yoursite.com/wp-admin/). Go to
Appearance > Themesto find MedXtore theme. - After seeing MedXtore theme’s thumbnail, choose and click on
Activateto install it in your site.
2.2.2. Theme Update
To update theme, download the latest package from Themeforest -> delete the old theme and reinstall the new theme package.
Note:
- Make sure you do not modify any code files in our theme directory before updating to make sure your customizations are not lost when updating. If you need to backup your theme before updating. You should use the Child Theme to customize the theme.
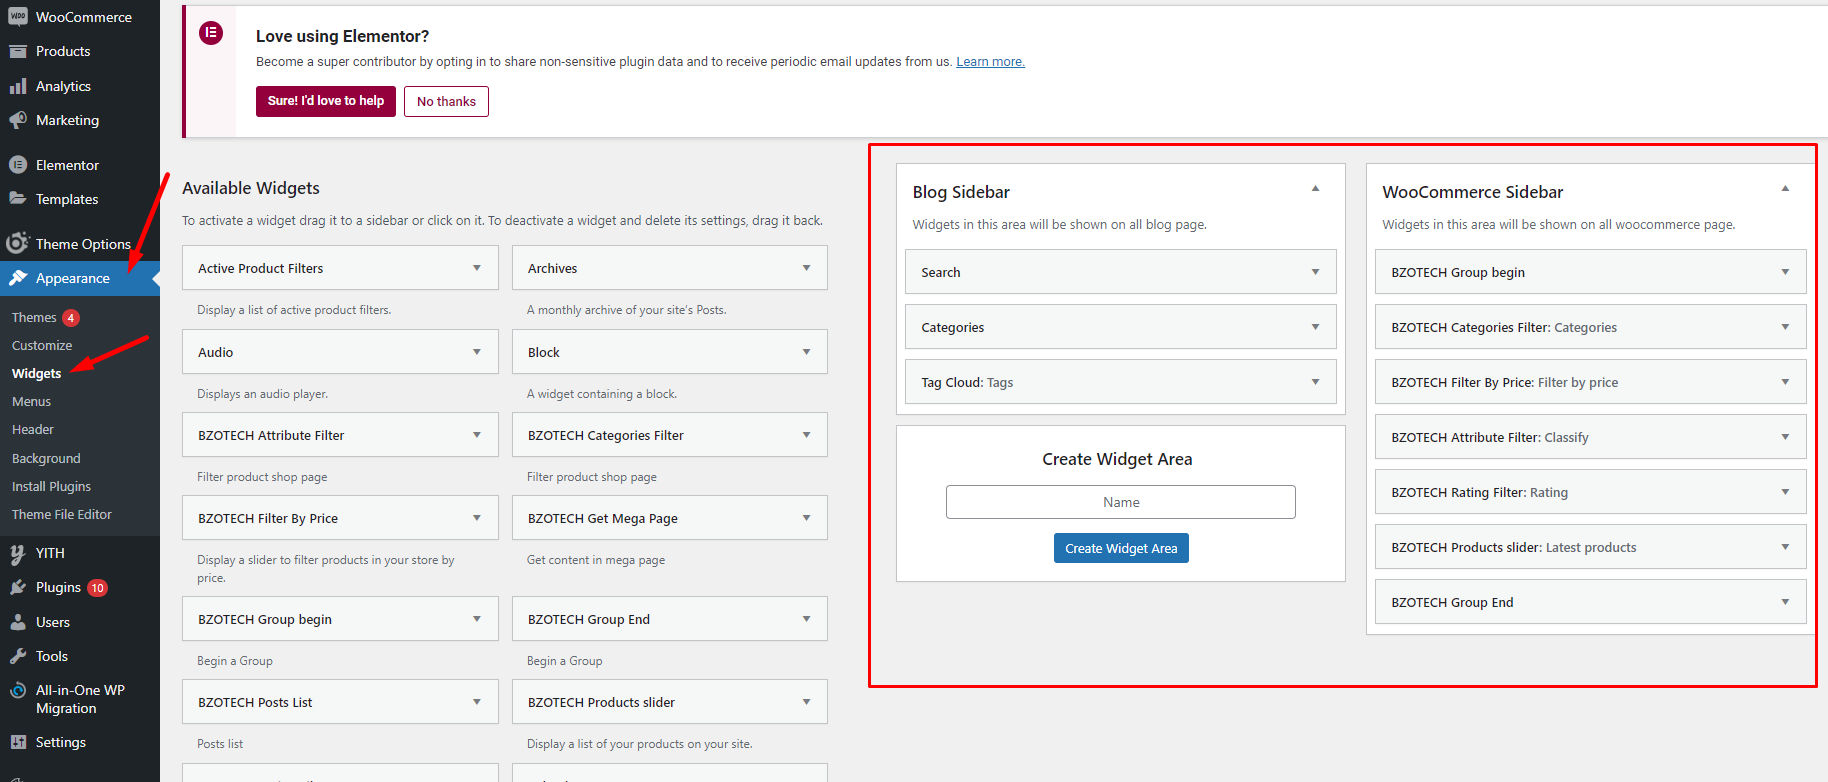
- The widget setting is not saved when you update theme, BEFORE update theme, please open the widget setting in a new window and keep it to compare after update.
2.3. Plugin Installation
To ensure that the theme works properly and has all of its features, all of the essential plugins should be installed and enabled when the theme is installed.
- After activating the theme, select
Install Pluginsoption in MedXtore theme details.
- Choose all of required plugins then select
Installand clickApply.
- After installing, all the installed plugins are automatically activated. You will see the successfully message.

If you find that any plugin was not successfully installed when installation, please select each of them and install them one by one again. If your server does not allow automated installation, you must install them manually using plugins in the data/plugins folder.
2.4. One Click Demo Import
Importing demo data is the simplest method to get your theme up and running. Instead of creating content from scratch, you will be able to quickly edit everything. Just by some clicks, you will get a full website look exactly as same as our live demo.
1. In the Dashboard, go to Theme Options > Import Demo Content. There are 3 import demo content options:
- Import Now: Full import demo content.
- Import Without Media: Import demo content without media
- Import Media: Only import Media
In this guide, we will go through the full import option – Import Now.

2. It can take a few minutes to import everything. Please wait until it is completed and do not refresh the page or hit the back button. Once it completes, you will see a Import Complete! message.

IMPORTANT: After import the demo data, please do following configurations:
+ Set up Mailchimp as this instruction.
+ Setting Layout Elementor: Go to Edit with Elementor -> Site Setting -> Layout -> Content Width then set 1560 for desktop and Gap between elements (px) = 0, Gap between elements (px): active all screen


+ Setting Currency:

In Admin Dashboard, go to WooCommerce -> Setting -> Currency


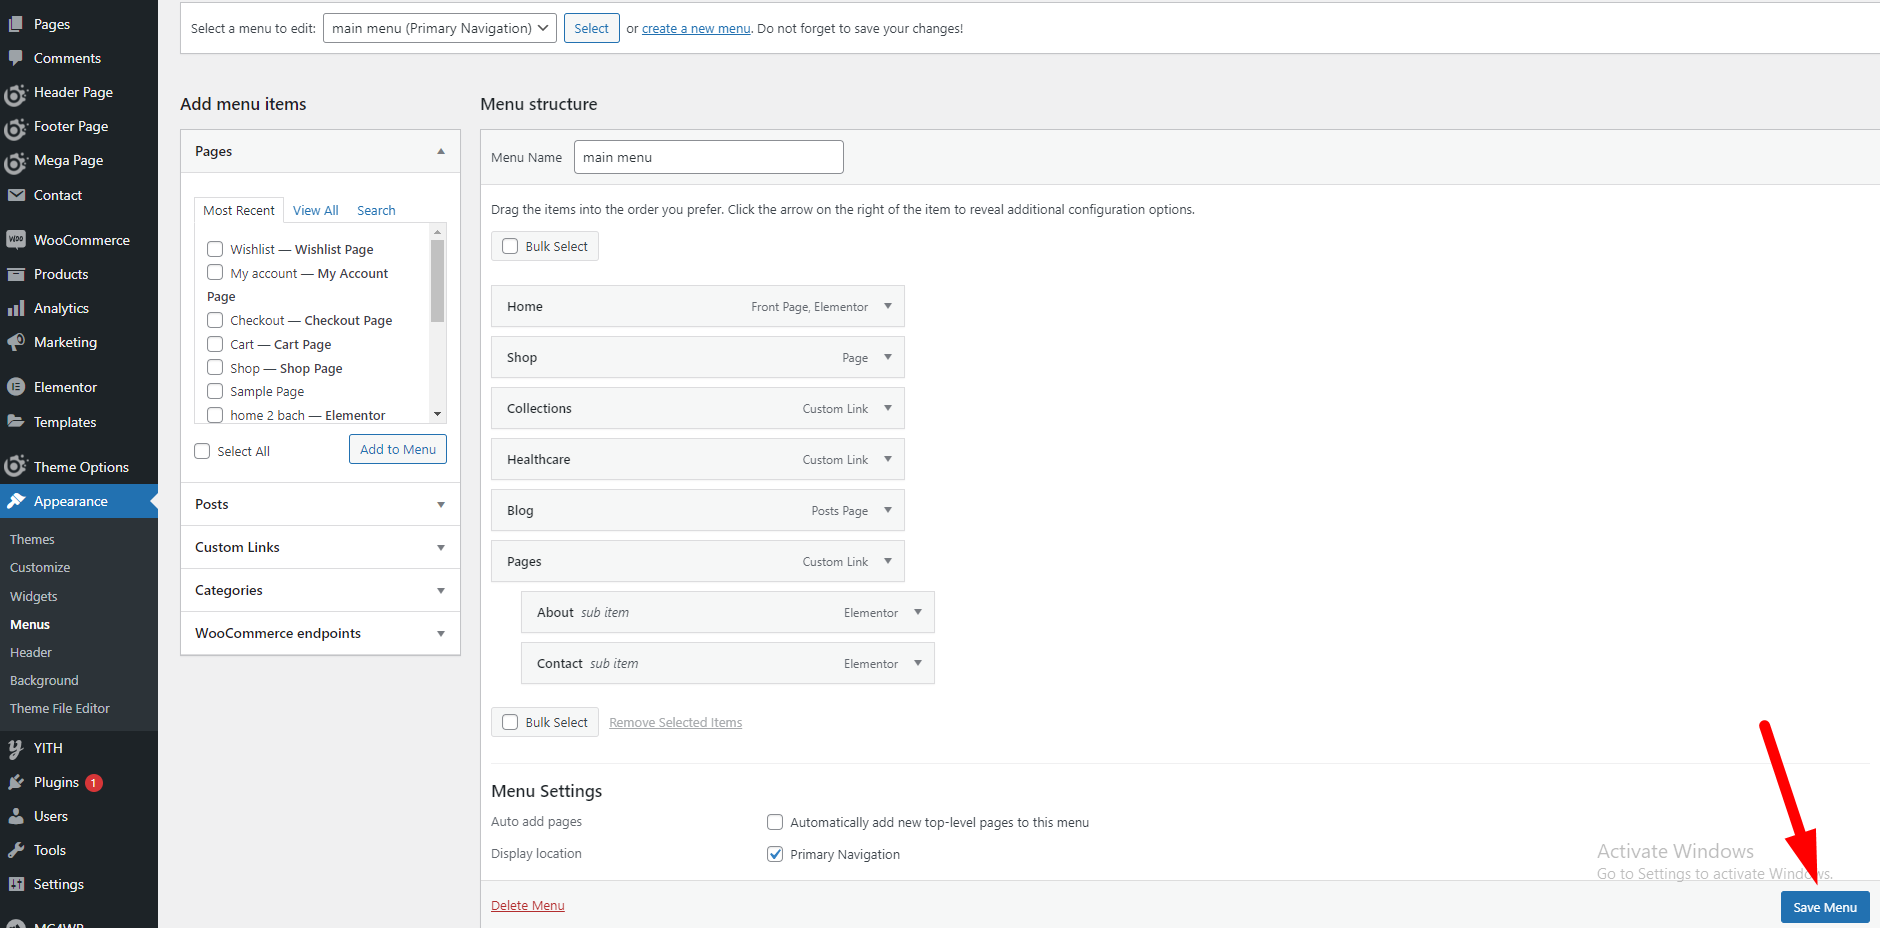
+ Save Menu: Go to Admin Dashboard -> Appearance -> Menus -> Main Menu -> Save Menu
+ Save YITH WooCommerce Compare config: Go to Admin Dashboard -> YITH -> Compare -> SAVE OPTIONS

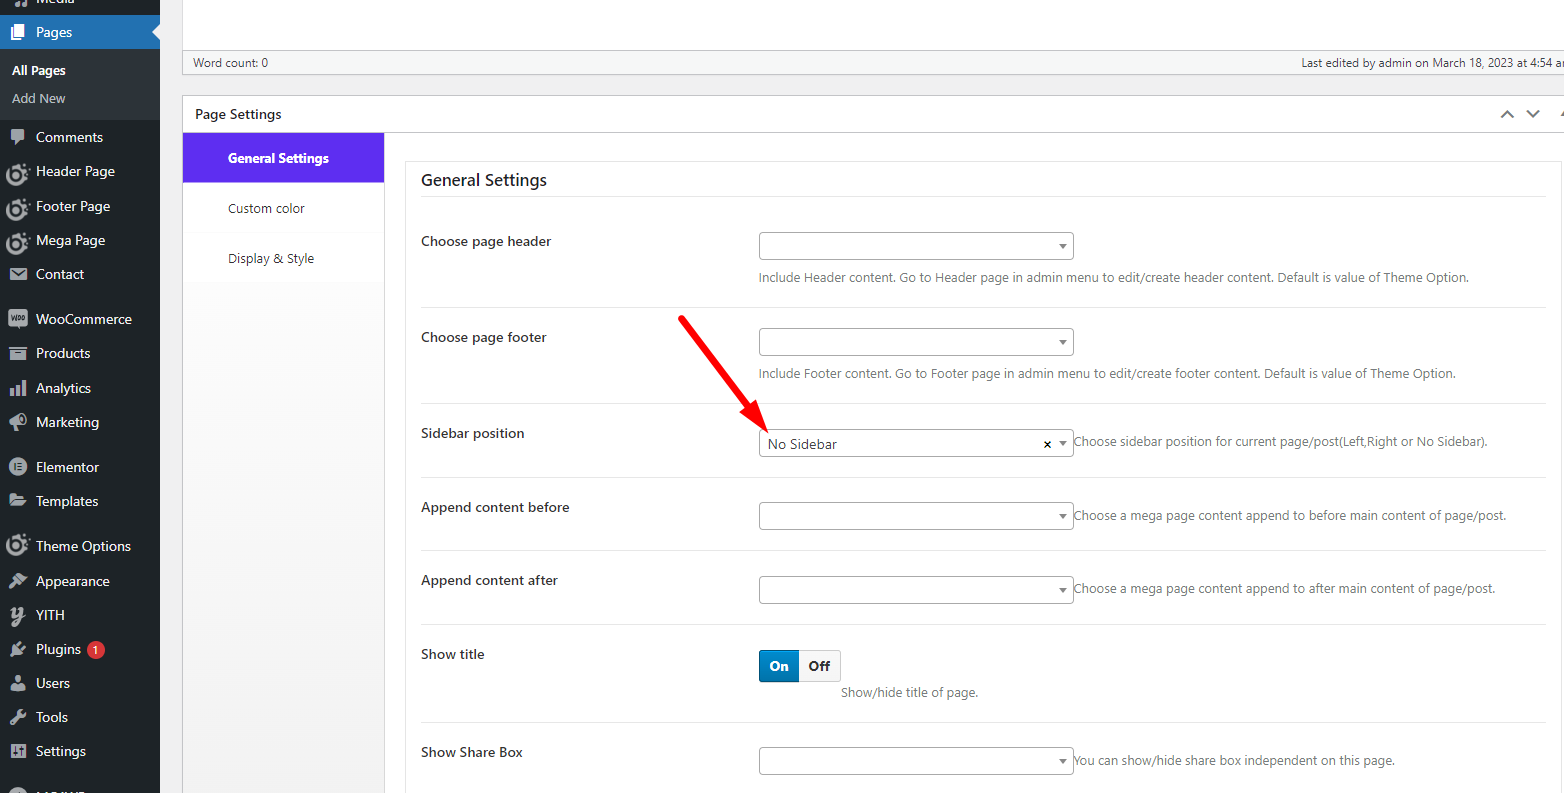
+ Config My Account Page: Go to Admin Dashboard -> Pages -> My Account -> Edit Page -> Page Setting -> General Setting -> Sidebar position -> No Sidebar -> Update
3. CONFIGURATION
This configuration includes all settings for MedXtore theme.
In Admin Dashboard, go to Theme Options

| Config Name | Value | Description |
| Basic Settings | ||
| General | ||
| Header Page | Select option | Select header style for all pages |
| Footer Page | Select option | Select footer style for all pages |
| Show BreadCrumb | On/Off | Turn on, off the breadcrumb |
| If BreadCrumb is On: Background breadcrumb image | Upload breadcrumb image | |
| 404 Page | Select option | Select the page including to 404 page |
| Preload | ||
| Show Preload | On/Off | Turn on, off the preload |
| Background | Color picker | Change default body background for preload |
| Preload Style | Select option | Choose default preload style for your site |
| Preload Image | Upload preload image | |
| Other | ||
| Show scroll top button | On/Off | This allow you to show or hide scroll top button |
| Show wishlist notification | On/Off | This allow you to show or hide wishlist notification when add to wishlist |
| Show tool panel | On/Off | This allow you to show or hide tool panel |
| Body Background | Color picker | Change default body background |
| Body typography | Select option | Custom font in Body |
| Title typography | Select option | Custom font in Title |
| Main color | Color picker | Change main color of your site |
| Main color 2 | Color picker | Change main color 2 of your site |
| Page Style | Select option | Choose default style for pages |
| Custom container width(px) | Value | You can custom width of container on your site. Default is 1200px |
| Show share box | Select option | You can show/hide share box on post, page, product pages |
| Add custom share box | Select option | Add more share box |
| Blog & Post | ||
| General | ||
| Blog banner | On/Off | Show/hide banner post list |
| Background banner | Upload | Enter background image |
| Content banner | Text editor | Enter content banner |
| Link banner | Url | Enter Link banner |
| Append content before post/blog/archive page | Select option | Choose a mega page content append to before main content of post/blog/archive page |
| Append content after post/blog/archive page | Select option | Choose a mega page content append to after main content of post/blog/archive page |
| Sidebar Blog | Select option | Set sidebar position for your blog page. Left, Right, or No sidebar |
| Sidebar select display in blog | Select option | Choose a sidebar to display |
| Sidebar blog style | Select option | Set sidebar style for your blog page |
| Default style | Select option | Choose a style to active display |
| Blog pagination | Select option | Choose a style to active display |
| Show number filter | On/Off | Show/hide number filter on blog page |
| Show type filter | On/Off | Show/hide type filter(list/grid) on blog page |
| Show order filter | On/Off | Show/hide order filter(list/grid) on blog page |
| Show meta data | Yes/No | Show/hide meta data(author, date, comments, categories, tags) on post detail |
| List Settings | ||
| Custom list thumbnail size | Value | Enter size thumbnail to crop. [width]x[height]. Example is 300×300 |
| Sub string excerpt | Value | Enter number of character want to get from excerpt content. Default is full(999). Example is 80. Note: This value only apply for items style can be show excerpt |
| List item style | Select option | Choose a style to active display |
| Grid Settings | ||
| Grid column | Select option | Choose a style to active display |
| Custom grid thumbnail size | Value | Enter size thumbnail to crop. [width]x[height]. Example is 300×300 |
| Sub string excerpt | Value | Enter number of character want to get from excerpt content. Default is full(999). Example is 80. Note: This value only apply for items style can be show excerpt. |
| Grid item style | Select option | Choose a style to active display |
| Grid display | Select option | Choose a style to active display |
| Post detail Settings | ||
| Style Single Post | Select option | Select the available style for single post |
| Sidebar Single Post | Select option | Set sidebar position for your post detail page. Left, Right, or No sidebar. |
| Sidebar select display in single post | Select option | Choose a sidebar to display |
| Sidebar post style | Select option | Set sidebar style for your single post. |
| Append content before post detail | Select option | Choose a mega page content append to before main content of post detail. |
| Append content after post detail | Select option | Choose a mega page content append to after main content of post detail. |
| Show thumbnail/media | On/Off | Show/hide thumbnail image, gallery, media on post detail. |
| Custom single image size | Value | Enter size thumbnail to crop. [width]x[height]. Example is 300×300 |
| Show meta data | Select option | Show/hide meta data(author, date, comments, categories, tags) on post detail. |
| Show author box | On/Off | Show/hide author box on post detail. |
| Show navigation post | On/Off | Show/hide navigation to next post or previous post on the post detail |
| Show related post | On/Off | Show/hide related post on the post detail. |
| Related title | Text field | Enter title of related section. |
| Related number post | Value | Show/hide order filter(list/grid) on blog page |
| Related custom number item responsive | Value | Enter item for screen width(px) format is width:value and separate values by “,”. Example is 0:2,600:3,1000:4. Default is auto. |
| Related item style | Select option | Choose a style to active display |
| Layout Settings | ||
| Sidebar Page | Select option | Set sidebar position for your default page. Left, Right, or No sidebar. |
| Sidebar Position on Page Archives | Select option | Set sidebar position for your archives page(category/tag/author page…). Left, Right, or No sidebar |
| Sidebar select display in page Archives | Select option | Choose a sidebar to display |
| Sidebar archive style | Select option | Set sidebar style for your archive |
| Sidebar Position on search page | Select option | Set sidebar position for your search page. Left, Right, or No sidebar |
| Add SideBar | Add custome sidebar | |
| Shop | ||
| General | ||
| Show banner | On/Off | Show/hide banner product list |
| Background banner | Upload image | Enter background image |
| Content banner | Text field | Enter content banner |
| Link banner | Link | Enter Link banner |
| Sidebar Position WooCommerce page | Select option | Set sidebar position for your WooCommerce page(Shop, Checkout, Cart, My Account, Product category/tag/taxonomy page…). Left, Right, or No sidebar |
| Sidebar select WooCommerce page | Select option | Choose one style of sidebar for WooCommerce page |
| Sidebar woo style | Select option | Set sidebar style for your woo |
| Default style | Select option | Choose a style to active display |
| Gap Products | Select option | Choose space. The space between the items on the shop page |
| Product Number | Value | Enter number product to display per page. Default is 12 |
| Product new in(days) | Value | Enter number to set time for product is new. Unit day. Default is 0 |
| Shop pagination | On/Off | Choose a style to active display |
| Shop ajax | On/Off | Enable ajax process for your shop page |
| Thumbnail animation | Select option | Choose a animation. |
| Show number filter | On/Off | Show/hide number filter on shop page |
| Show type filter | On/Off | Show/hide type filter(list/grid) on shop page |
| Show order filter | On/Off | Show/hide order filter(list/grid) on shop page |
| Show color attribute | On/Off | Show/hide color attribute on list item product |
| Show button quick view | On/Off | Turn on/off quickview option |
| Quick view style | Select option | Choose a style to display |
| List Settings | ||
| Grid column | Select option | Enter size thumbnail to crop. [width]x[height]. Example is 300×300 |
| List item style | Value | Choose a style to active display |
| Grid Settings | ||
| Custom list thumbnail size | Select option | Choose a style to active display |
| Custom grid thumbnail size | Select option | Enter size thumbnail to crop. [width]x[height]. Example is 300×300 |
| Grid item style | Select option | Choose a style to active display |
| Grid display | Select option | Choose a style to active display |
| Advanced | ||
| Cart display | Select option | Choose a style to active display |
| Checkout display | Select option | Choose a style to active display |
| Header WooCommerce Page | Select option | Include Header content. Go to Header in admin menu to edit/create header content. Note this value default for all pages of your site, If have any page/single page display other content pehaps you are set specific header for it |
| Footer WooCommerce Page | Select option | Include Footer content. Go to Footer in admin menu to edit/create footer content. Note this value default for all pages of your site, If have any page/single page display other content pehaps you are set specific footer for it |
| Append content before WooCommerce page | Select option | Choose a mega page content append to before main content of page/post |
| Append content after WooCommerce page | Select option | Choose a mega page content append to after main content of page/post |
| Product | ||
| General | ||
| Product detail style | Select option | Select style of product detail |
| Sidebar Position WooCommerce Single | Select option | Left, or Right, or Center |
| Image zoom | Select option | Choose a style to display |
| Product tab style | Select option | Choose a style to display |
| Show Excerpt | On/Off | Turn on/off excerpt |
| Extra display | ||
| Show latest products | On/Off | Turn on/off latest products |
| Show upsell products | On/Off | Turn on/off upsell products |
| Show related products | On/Off | Turn on/off related products |
| Show Single Number | Value | Show single number post |
| Show Single Size | Value | Custom size for related,upsell products. Enter size thumbnail to crop. [width]x[height]. Example is 300×300 |
| Custom item devices | Value | Enter item for screen width(px) format is width:value and separate values by “,”. Example is 0:2,600:3,1000:4. Default is auto |
| Single item style | Select option | Choose a style to active display |
| Advanced | ||
| Append content before product page | Select option | Choose a mega page content append to before main content of page/post |
| Append content before product tab | Select option | Choose a mega page content append to before product tab |
| Append content after product tab | Select option | Choose a mega page content append to before product tab |
| Append content after product page | Select option | Choose a mega page content append to after main content of page/post |
| Import / Export | ||
| Import Options | Import from Clipboard / Upload file | This will overwrite all existing option values, |
| Export Options | Copy from Clipboard / Export File | Here you can copy/download your current option settings. Keep this safe as you can use it as a backup should anything go wrong, or you can use it to restore your settings on this site (or any other site). |
4. TRANSLATE THEME/PLUGIN WITH LOCO TRANSLATE
Loco Translate provides in-browser editing of WordPress translation files. It also provides localization tools for developers, such as extracting strings and generating templates.
First, you need to install and active Loco Translate plugin for your site.


Translate Theme
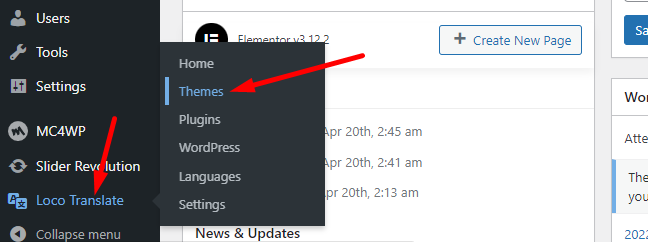
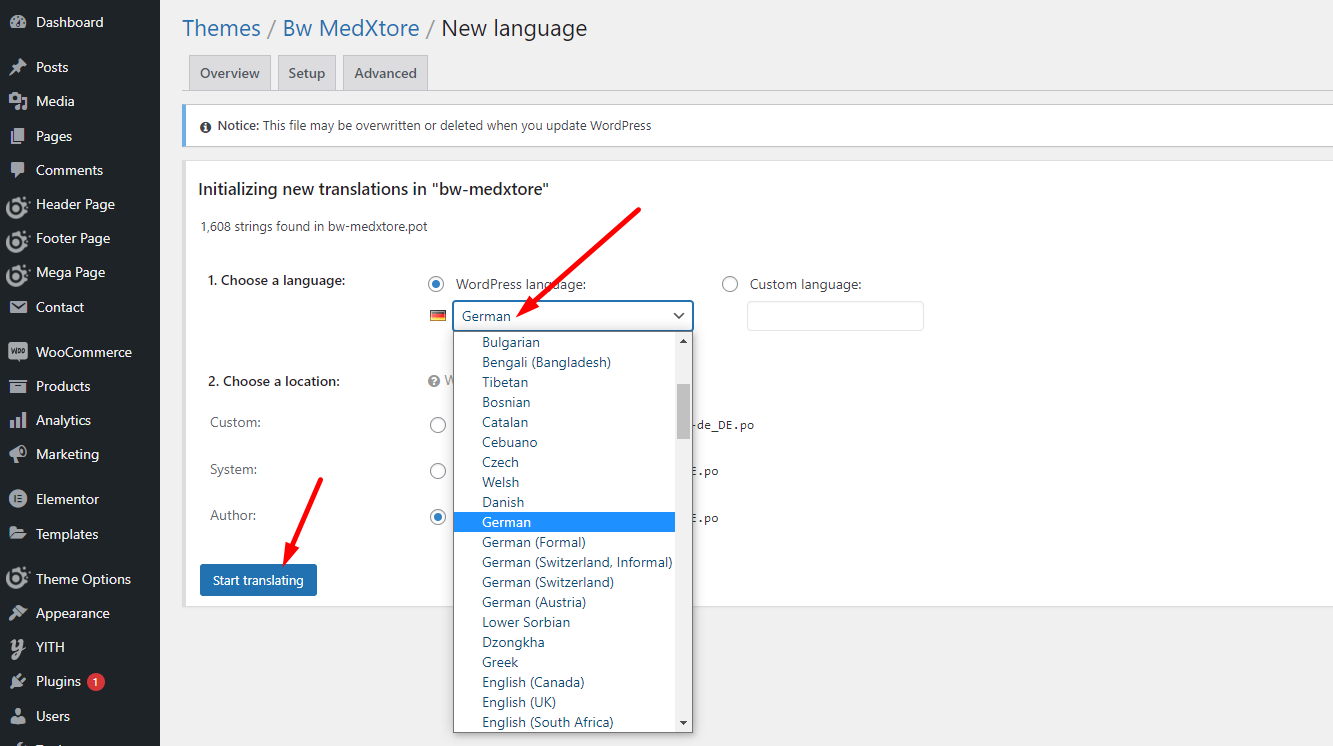
Step 1: In WordPress Dashboard, Go to Loco Translate -> Themes

Step 2: Choose theme want to translate from theme list.


Step 3: Click to New language to add language to translate. Or choose exits language to edit.


Step 4: Choose a language and location and click Start translating to start translate.
Step 5: Translate interface

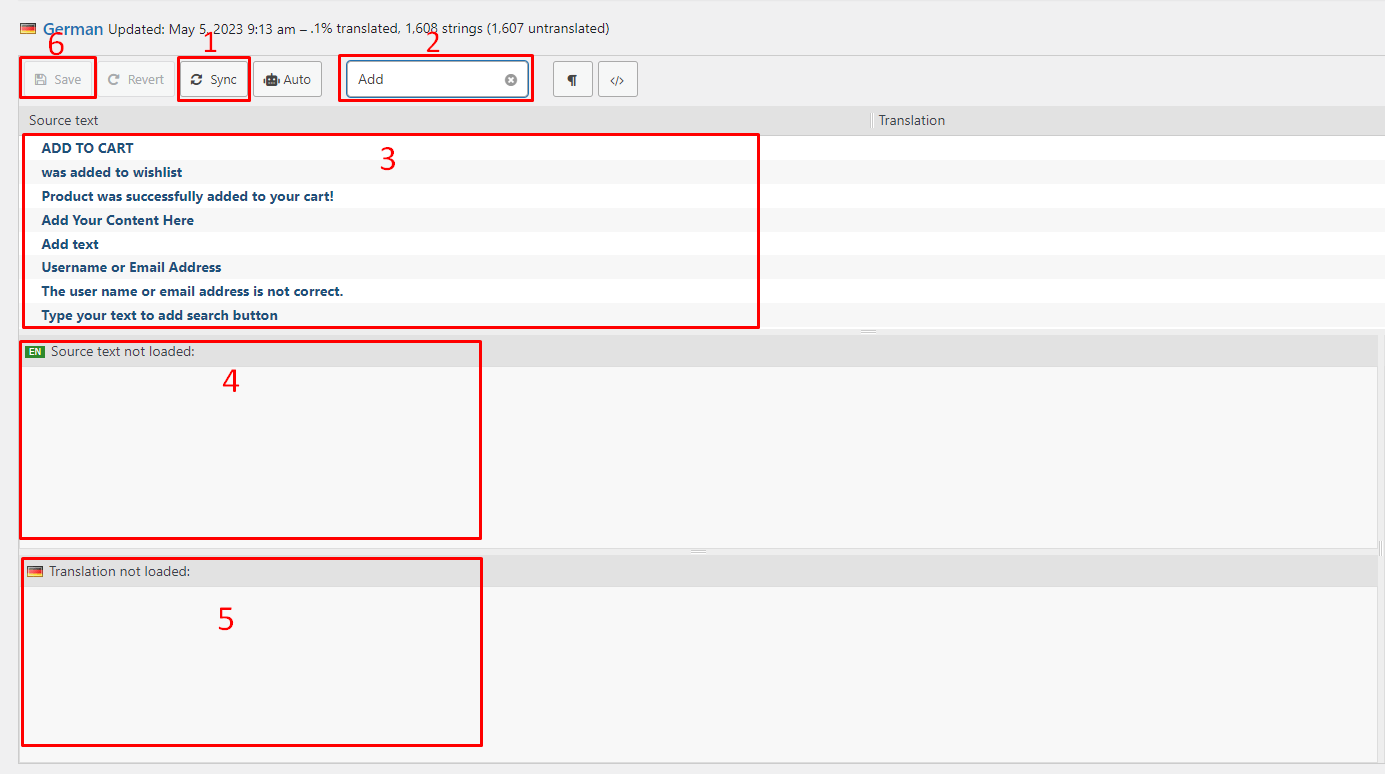
1: Click Sync button to update new pot file. Use when update theme or update pot file in theme-folder -> languages folder.
2: Enter key to find text/string
3: Source text, click to text want to translate.
4: Source text display.
5: Enter text translated.
6: Click Save to finish.
Translate Plugin
Same as translate theme, In WordPress Dashboard, Go to Loco Translate -> Plugins and sequentially the remaining steps as you are translating the theme.
5. SUPPORT
Knowledge Base
Before filing a new support ticket, please follow the steps below to assist us expedite your request. This is for everyone’s advantage and will assist to make the entire process more efficient. It’s critical, and we ask that everyone to these guidelines.
Read the item documentation first:
The documentation covers all the item setting and configuration. You may find the solution for your issues here.
Important considerations for your website:
- Runs the most recent version of the item and validate all Theme Requirements.
- Disable any other third-party plugins you may be using to see whether this resolves the issue.
- Clear and deactivate all caches, including browser, plugin, and server caches.
To open a support ticket for the item on our HELP CENTER, choose the Department and then provide the order ID in the ticket and submit. Please keep in mind that providing us with information about your website and some screenshots of the problem will make it simpler for us to answer your query and assist you more quickly.
Important!
DO NOT REPLY TO THE TICKET VIA THE EMAIL NOTIFICATION. Any responses sent via this no-reply-email may be overlooked since our support team was unable to view them.
If you have any problems with the ticket system, please contact us at [email protected] for assistance. However, the first option is more convenient and makes it easy for both of us to monitor the problems.


